Pestproblems in Woodbridge homes often begin with subtle, easily missed indicators that escalate into structural damage or health risks if not identified early. This guide explains how to recognize those early signs, why they matter for property value and family safety, and what practical steps to take when evidence appears. You will learn the most common universal signs of infestation, focused checks for rodents, termites, cockroaches and ants, and how to spot wildlife intrusion from raccoons, squirrels, and bats. The article also walks through immediate homeowner actions and clear thresholds for calling a professional, with a brief, trust-building note about requesting a free estimate from Clearview Pest Control Inc.for local inspection and service scheduling in Woodbridge. Read on for checklists, comparison tables, and step-by-step inspection tactics that make identifying a serious pestproblem straightforward and actionable.
What Are the Most Common Signs of Pest Infestation in Woodbridge Homes?
The most common signs of pest infestation are universal indicators—noises, droppings, odors, visible damage, and live sightings—that reveal biological activity and potential structural compromise. These signs work as diagnostic meronyms of an infestation: droppings and nesting material are parts of a larger presence, while entry points act as components of the building envelope that pests exploit. Recognizing these signals early reduces repair costs and limits health risks, because confirmation lets you isolate problem areas and document evidence for a professional assessment. Below is a concise list of the top signs to watch for and what each typically indicates.
Common warning signs and what they usually imply:
Unexplained noises in walls or attic: Frequent scratching or scurrying suggests rodents or squirrels active inside voids.
Fresh droppings or urine stains: Small, pellet-like droppings usually indicate mice; larger, capsule-shaped droppings suggest rats.
Grease marks or rub lines along baseboards: Repeated rubbing by rodents leaves dark smears at entry gaps.
Mud tubes or blistering paint near foundations: Tubes and bubbling paint often point to subterranean termiteactivity.
Live sightings of insects or animals: Seeing live roaches, antstrailing, or a raccoonin daylight signals established populations.
Shredded insulation, chewed wiring, or gnaw marks:
Structural damage points to rodentsor wildlife that nest in walls and attics.
These universal signs provide immediate clues and guide where to focus a more detailed inspection; next, we’ll explore what unexplained noises typically mean and how to localize them for further investigation.
How Do Unexplained Noises Signal Rodent or Wildlife Activity?
Unexplained noises—scratching, scurrying, thumping, and squeaking—are behavior-based signals that reveal both the species likely responsible and the time of activity. Rodentssuch as house mice and Norway rats often produce soft scurrying and gnawing sounds at night, with mice active during quiet hours and rats sometimes audible during daytime. By contrast, raccoonsand larger wildlife create louder thumps and tearing sounds near the roofline or attic during dusk and dawn. When you hear consistent noise, perform a controlled check: listen during quiet periods, tap drywall to elicit movement, and narrow down the area by moving through rooms systematically. Document the timing and location of noises to assist an inspector in prioritizing entry-point checks and trapping or exclusion strategies.
These auditory clues naturally lead to looking for the physical residues pestsleave behind, such as droppings and urine stains, which provide the next layer of evidence to confirm species and infestation severity.
What Do Pest Droppings and Urine Stains Look Like?
Droppings and urine stains are direct biological evidence that can often identify the pestgroup and the approximate size of an infestation through size, shape, and distribution. Mouse droppingsare small and pointed, roughly the size of a grain of rice, and are typically found near food sources, pantry shelves, or along baseboards. Rat droppingsare larger and spindle-shaped, often found in basements or along travel routes, while cockroach droppingsresemble coffee grounds or pepper and accumulate near appliances and under sinks. Urine stains or greasy rub marks appear as darkened streaks on walls and timbers where rodents repeatedly pass. For safety, avoid touching droppings; instead, photograph them, note exact locations, and keep pets and children away while preparing for a professional inspection or careful cleanup following recommended safety guidelines.
Documenting droppings prepares you for the targeted rodent inspection checklist that follows and helps professionals prioritize exclusion and repair work.
Torn insulation, nesting material in attics, larger segmented droppings in entry areas, noises at night
How Can Homeowners Identify Early Warning Signs of Rodent Problems in Their House?
Rodent problemsstart small but escalate quickly because micereproduce rapidly and rodents damage insulation, wiring, and stored goods—posing fire and contamination risks. Early warning signs include droppings, grease rubs along pathways, damaged packaging in pantries, and sightings near food sources or nesting areas. Conducting a systematic check of likely rodent highways—along baseboards, behind appliances, in attics, and in basements—helps map activity and guides exclusion efforts. The short checklist and step-by-step inspection below help homeowners gather the most useful evidence for evaluating severity and preparing for professional intervention if needed.
Rodent detection requires focused visual and olfactory checks before moving on to recognizing specific gnaw marks and nesting material.
What Are the Visual and Olfactory Clues of a Rodent Infestation?
Visual and olfactory clues are among the most reliable early indicators for rodents: look for small dark pellets along baseboards, shredded paper or fabric used as nest material in hidden voids, and greasy rub marks where rodents repeatedly travel. A distinct musky or musty odor in enclosed spaces like attics or pantries often signals a long-standing infestation and ammonia-like urine build-up. Use a flashlight and mirror to inspect hard-to-reach voids, check pantry seals and attic insulation, and note any chewed food packaging or electrical wiring. Photograph these clues and record their locations and the dates observed to create a timeline that is useful for any professional inspection or baiting/exclusionplan.
These visual and odor-based clues connect directly to gnaw marks and nesting behaviors, which provide further confirmation and telltale patterns of rodent activity.
How to Recognize Rodent Gnaw Marks and Nesting Materials?
Rodent gnaw markshave characteristic patterns: paired, semi-uniform scrapes with clean edges consistent with incisors, often on softer materials like wood, plastic, or wiring insulation. Fresh gnawing shows lighter, sharp-edged wood fibers; older damage darkens and may splinter. Nesting materials are commonly shredded paper, fabric, or insulation gathered into compact, warm nests inside attics, wall cavities, or behind appliances. Avoid disturbing suspected nests because rodents may be present and to preserve evidence; instead, photograph and document materials and locations. These observations help differentiate between transient rodent signs and established nesting requiring professional removal and exclusion.
After rodent checks, it is important to inspect for termites, whose signs can be less obvious but far more damaging to structure.
What Are the Early Warning Signs of Termite Infestation in Woodbridge Homes?
Termitesare structural pestswhose early signs—mud tubes, discarded wings, and soft or hollow wood—indicate active galleries and potential compromise of load-bearing elements. Subterranean termitesbuild mud tubes from soil to wood to maintain moisture, while drywood termitesmay leave small piles of frass or discarded wings after swarming. Detecting these meronyms of termite activity early prevents escalation by enabling targeted treatment, documentation of affected areas, and repairs or exclusionsto the foundation and wood framing. Below are three high-priority visual indicators homeowners should check for immediately.
The three visual indicators below are quick checks that homeowners can perform to assess urgency before contacting a professional.
How to Spot Termite Mud Tubes and Discarded Wings?
Mud tubes are narrow, earthen tunnels adhered to foundations, crawlspaces, or inside wall cavities that protect subterranean termitesas they travel; they feel dry and sandy when stroked. Discarded wings are often found near light sources, windowsills, or doorways after reproductive swarms; these wings are thin and translucent with a slightly serrated edge. Check foundation perimeters, crawlspaces, and interior baseboards in spring and late summer when swarm activity is most likely, and photograph tubes and wings without disturbing them. Finding either sign elevates urgency because it indicates active colonies that can rapidly expand and undermine structural integrity.
Documenting these signs leads to examining the wood itself for internal damage, which helps distinguish termite damage from rot or decay.
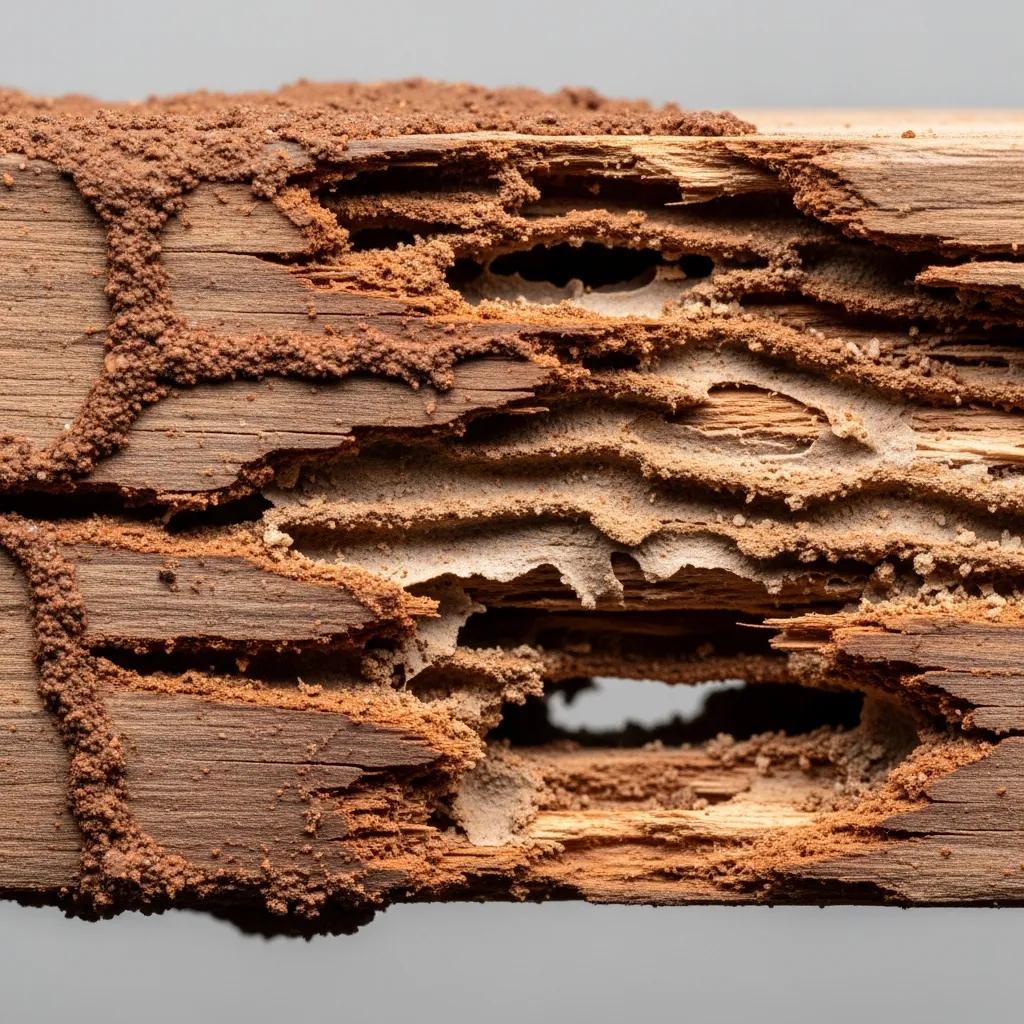
What Does Termite Wood Damage Look Like?
Termite-damaged woodoften sounds hollow when gently tapped and shows blistered paint or thin, layered galleries parallel to the grain when exposed. Unlike rot, which causes irregular softening and surface decay, termite galleries follow the wood grain and leave a papery, layered internal texture. Use a screwdriver or small pry bar at suspect spots to test for soft areas and inspect baseboards, window sills, and subflooring for sagging or distortion. If structural softness or visible galleries appear, restrict access to the area, document locations with photos, and prepare for an immediate professional evaluation to quantify damage and recommend treatment plus possible repairs and exclusions.
Wood in contact with wet soil or leaking structures; correlated with chronic moisture issues
How to Detect Cockroach and Ant Infestations: Key Indicators for Woodbridge Homeowners?
Cockroachand ant infestationshave distinct signs that point to species, habitat preference, and whether sanitation or professional treatment is required. Cockroachesleave pepper-like droppings, oily smear marks, and egg casings in dark, humid locations like under sinks and behind stoves. Antsform visible trails to food sources and can nest indoors or in soil near foundations; carpenter antsin particular leave frass and can damage wood. Early detection centers on locating droppings, following trails to nests, and assessing whether the problem is a nuisance infestation or one that threatens structure and health. Below are specific signs and a comparison to help discriminate between them.
After learning the visual cues, homeowners can follow targeted steps to collect evidence and address sanitation or call for professional control when needed.
What Are the Signs of Cockroach Presence, Including Droppings and Egg Casings?
Cockroach presenceis signaled by small, dark droppings resembling coffee grounds or black pepper, characteristic musty odors in heavy infestations, and oothecae—oval, capsule-like egg cases—hidden in crevices. Common habitats include under appliances, inside wall voids, behind baseboards, and in cluttered basements; German cockroaches favor kitchens and bathrooms. Use a flashlight at night to spot movement and look behind appliances and in cabinet corners for droppings and oothecae. Maintain sanitary practices—seal food, fix leaks, and reduce clutter—but recognize that persistent roach signs often require professional roach controlto remove harborages and apply targeted treatments.
These cockroach indicators contrast with ant trails which are typically linear and lead to visible nest sites, discussed next.
How to Identify Ant Trails and Nests in and Around Your Home?
Ant trailspresent as linear columns of workers traveling to food or nesting sites; following these trails often reveals entry points and nest locations such as soil mounds, wall voids, or wood galleries. Pavement and nuisance ants form surface trails and small soil accumulations, while carpenter antsleave wood shavings and have larger, noisier colonies that can affect structural wood. Inspect eaves, door thresholds, utility penetrations, and landscaping near foundations to find nests or entry points. Simple baiting and sanitation sometimes control nuisance ants, but carpenter antswarrant professional evaluation because their galleries can compromise structural wood and may require targeted treatment and repairs.
Insect Damage Assessment in Timber Structures: Structural and Health Concerns
Wood-boring insects (Coleoptera, termites) often cause both structural and aesthetic damage on wooden structures which can sometimes give rise to human health concerns.
Diagnostic evaluation of insect attack on existing timber structures: A review of some case studies, S Palanti, 2013
Large workers, noisy nests within moist wood; can cause structural damage
What Are the Signs of Wildlife Intrusion and Damage in Woodbridge Homes?
Wildlife intrusionleaves distinct structural and biological signs—shredded insulation, larger droppings, torn vents, and unusual noises—that differ from small pestevidence but carry significant health and repair implications. Raccoonstear and displace roofing materials when accessing attics, squirrelsgnaw holes at the roofline, and batsleave guano concentrated under roosting spots and create high-pitched noises at dusk. Identifying entry points and species-specific damage informs the safest response, since wildlife issues may involve zoonotic disease risks and require humane removal, exclusion, and repairs. Below are indicators to assess before arranging professional wildlife controland repair work.
Once you recognize these signs, the next step is differentiating species-specific noises and damage patterns to guide exclusion and repair priorities.
How to Recognize Noises, Nests, and Structural Damage Caused by Raccoons, Squirrels, and Bats?
Raccoon activityproduces loud thumps, tearing sounds, and scattered nesting material near roof access points, while squirrelscreate repetitive scratching and chewing noises along rafters and roof edges. Batsproduce high-frequency squeaks and leave concentrated guano under roost sites, often near eaves or attics, and their droppings are crumbly and darker than rodent pellets. Shredded insulation and displaced soffits indicate active denning, and chew marks on vents and wiring reveal persistence that can pose fire and contamination hazards. Photograph evidence without direct contact, record times of activity, and avoid sealing entry points until wildlife are absent to prevent trapping animals inside.
These species-specific observations lead directly to a focused inspection of common wildlife entry points, which helps determine necessary exclusion and repair work.
What Are Common Wildlife Entry Points and How to Spot Them?
Common wildlife entry points include roof vents, soffit gaps, chimney openings, holes in fascia, and foundation gaps—areas often overlooked during routine maintenance but exploited by animals seeking shelter. Look for fresh claw marks, displaced flashing, gaps with nesting debris nearby, or grease and rub marks along siding and trim where animals repeatedly pass. Footprints in attic dust, fresh nesting material at eaves, and torn screens are additional clues that an animal has established access. Because improper sealing can trap wildlife inside, document entry points and evidence first, then arrange professional exclusion and repair servicesthat integrate humane removal with structural sealing and fixes.
Entry Point
Typical Signs
Recommended Homeowner Check
Roof vents / soffits
Tearing, shredded insulation, noise at night/dusk
Inspect vents for gaps, look for fresh nesting material and claw marks
Chimney / flue
Droppings, soot disturbance, displaced cap
Check chimney cap integrity and look for small droppings on the hearth
Foundation gaps / vents
Footprints, grease marks, entry holes
Examine vents and foundation seams for holes and rub marks
Why Is Early Detection of Pest Problems Crucial for Woodbridge Homeowners?
Early detection limits the scale of structural damage, reduces remediation costs, and minimizes health risks by containing infestations before they spread. Structural pestslike termitesand carpenter antscause progressive wood loss that may compromise framing, while rodentsgnaw wiring and contaminate insulation, increasing fire and health risks from allergens and pathogens. Prompt identification also preserves property value by enabling accurate documentation and repair planning during the smallest, least costly intervention window. For homeowners concerned about contamination or structural compromise, professional inspection can quantify damage, recommend remediation, and coordinate repairs and exclusionsto restore building integrity.
Understanding these consequences frames the next discussion: how early identification ties directly to property protection and the health of household members.
How Does Early Identification Protect Your Property Value and Prevent Structural Damage?
Early identification prevents small problems from escalating into major repairs by allowing targeted treatment and exclusionbefore pestsundermine framing, subfloors, or insulation. For example, addressing mud tubes or early galleries in their initial zones is far cheaper than replacing compromised joists or subflooring later. Documenting early findings also helps with insurance evaluations and disclosure at sale time, preserving value by showing timely professional intervention. Scheduling periodic inspections and acting on early signs is an economical strategy: spending modestly on inspection and exclusionoften avoids disproportionate structural or remediation expenses in the long term.
With property risk in mind, it is equally important to consider the direct health implications pestproblems pose to families.
What Health Risks Do Pest Infestations Pose to Your Family?
Pestinfestations introduce health risks through allergens, disease vectors, and contamination of living spaces: rodent droppingscarry pathogens, cockroach allergensworsen asthma, and bat guanocan harbor fungal spores associated with histoplasmosis. Children, elderly residents, and immunocompromised individuals are particularly vulnerable to these exposures. Additionally, shredded or contaminated insulation reduces indoor air quality and can circulate allergens and microbial particles. Recognizing health risks shifts the priority from mere nuisance control to immediate remediation and professional cleanup of contaminated materials to protect household health.
Awareness of structural and health risks leads directly to practical homeowner actions and clear criteria for calling professional services for inspection, treatment, and repairs.
What Should Woodbridge Homeowners Do When They Spot Signs of Pest Infestation?
When signs appear, follow a safe, evidence-focused workflow: document and photograph evidence, restrict access to affected areas, perform basic sanitation, and decide whether to attempt DIY measures or request professional help. Immediate actions limit further contamination and preserve evidence for an inspector who can recommend treatment, repairs, and exclusions. Below is a step-by-step homeowner checklist that balances safety with effective evidence gathering and sets clear escalation thresholds for professional intervention.
Start with these immediate steps to secure the area and gather the information professionals need to act efficiently.
Document Evidence: Photograph droppings, mud tubes, gnaw marks, and entry points with date and location notes.
Restrict Access: Keep children and pets away from contaminated areas and avoid disturbing nests or tubes.
Sanitize and Store Food: Seal food items and clean visible spills; reduce attractants by removing clutter.
Preserve Evidence: Do not seal doors or vents if wildlife may be inside; note smells, noises, and sightings for the inspector.
Collect Timing Info: Record when signs were first noticed and any patterns in activity.
Following these steps helps homeowners make a clear decision about escalation, which the next section explains with concrete triggers for calling a pro.
When Is It Time to Call Clearview Pest Control Inc. for Professional Help?
Call Clearview Pest Control Inc.when evidence indicates active structural pests, wildlife inside living spaces, or contamination that exceeds safe homeowner cleanup—specific triggers include discovery of mud tubes, visible termite galleries, a nest in the attic, chewed electrical wiring, or large active rodent populations. A professional inspection from Clearviewincludes a visual assessment, evidence documentation, identification of species and likely entry points, and recommended next steps such as targeted treatment, repairs, or exclusions; these services align with their listed offeringsincluding termite control, rodent control, wildlife control, and repairs/exclusions. Request a free estimateto prioritize urgency and get a clear plan for remediation and structural repairs that protect health and value.
How to Request a Free Estimate and Schedule Pest Control Services?
Prepare photos, notes on locations and timing of signs, and a brief description of symptoms before contacting Clearview Pest Control Inc.; providing this information speeds triage and scheduling. To request a free estimateor schedule service in Woodbridge, call (347) 224-2581 or consult Clearview’s Google Business Profile for local details and reviews; have your address, photos, and availability ready when you call. Expect the free estimate process to include verbal triage, an on-site visual inspection appointment, and a written estimate outlining recommended treatments, necessary repairs or exclusions, and next steps. This straightforward process helps homeowners move from detection to remediation quickly and with documented recommendations.
Gather evidence and notes before calling: Photos, locations, timing, and any DIY measures taken.
Contact Clearview: Call (347) 224-2581 and request a free estimatefor a visual inspection and written recommendations.
Prepare for inspection: Clear access points, secure pets, and be ready to walk through areas with the technician.
These steps help ensure Clearviewcan provide an efficient, local assessment and scope the correct combination of pest control, exclusion, and repairsto resolve the problem.
Homeowners in Woodbridge should be familiar with the universal signs of pest infestations, including noises, droppings, odors, visible damage, and live sightings. These indicators can reveal the presence of rodents, termites, cockroaches, ants, and various wildlife, enabling early detection and prevention.
By recognizing these signs, homeowners can take proactive measures to address pest problems before they escalate, protecting the structural integrity of their homes and the health of their families. Regularly inspecting for these telltale signs is crucial for maintaining a pest-free environment.
Identifying Rodent Activity
Rodent infestations often leave behind distinct evidence, such as droppings, grease marks, and nesting materials. Homeowners should be vigilant in checking for these signs, particularly in areas near food sources and along baseboards. Paying close attention to unexplained noises, like scratching or scurrying, can also help pinpoint the location of rodent activity.
Addressing rodent problems promptly is essential, as these pests can pose significant health risks and cause structural damage through their gnawing and nesting behaviors. Proper identification of rodent signs is the first step in implementing effective control measures.
Detecting Termite Infestations
Termites can be a significant threat to Woodbridge homes, causing extensive and hidden damage to the structural integrity of a building. Homeowners should be on the lookout for mud tubes, discarded wings, and signs of wood damage, such as hollow or papery textures.
Proactive inspection, especially during peak swarming seasons, can help identify termite activity early on. Caught early, termite infestations can be more effectively managed, preventing costly repairs and preserving the value of the home.
Recognizing Signs of Wildlife Intrusion
Woodbridge homeowners may also encounter issues with wildlife, such as raccoons, squirrels, and bats, which can cause significant damage and pose health risks. Homeowners should be on the lookout for signs of structural damage, including shredded insulation, displaced flashing, and unusual noises.
Identifying the specific wildlife intruder and their entry points is crucial for implementing appropriate exclusion and removal measures. Addressing wildlife problems promptly is essential to protect the home and ensure the safety of the occupants.